Thursday 31 March 2011

Evaluation - Question 2: Representation (part 1)

Character Representation!

A character should:

  • Deal in stereotypes
  • Exaggerations and generalisations
  • Useful for the audience to recognise
  • all media representations are CONSTRUCTS - there are choices about costume, mise en scene, make-up, camera angle, position in the frame, lighting, sound track and editing.

After looking at many different movies and looking at the detail put in to ensure each character is distinguished, we chose the costumes for our characters.


Ben's costume consisted of:

  • thick, outdoor jacket
  • plain white, long-sleeved shirt
  • black balaclava 
  • black gloves
  • black trousers
  • thick, outdoor boots
Each element of the costume was chosen to accurately portray that of a typical kidnapper/murderer.


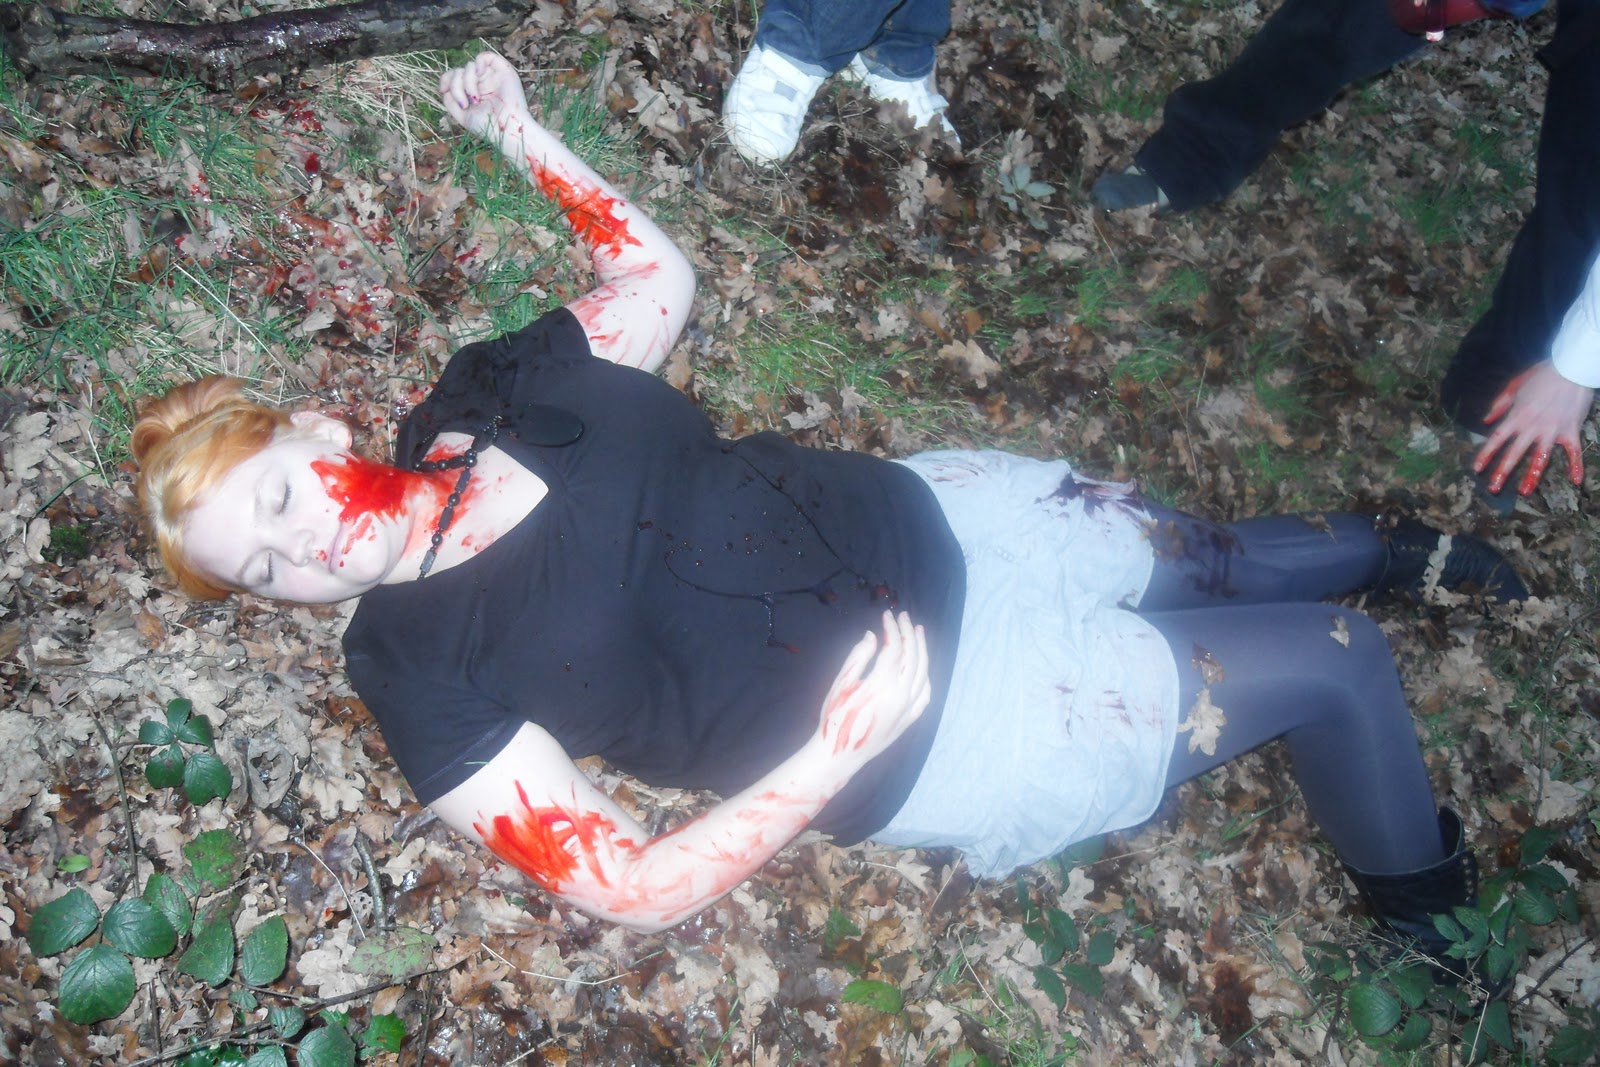
My costume consisted of:

  • low cut, black top 
  • short, grey skirt
  • dark grey tights
  • black boots
Each element of my costume was chosen to portray a typical victim. I wanted to show that, before she had died, she was a vulnerable girl. 

Evalutation- Question 4 & 5: Media Distribution

A media institution that might distribute my media is Candi Studios. Candi Studios is a small independent studio with good equipment but low production budgets.

Ways that will get our media to the audience:

- Cinema Screening - Local independent studio
- Youtube
- Vimeo
- Blogger
- Facebook
- 200 DvD released copies.

Evaluation- Question 3: Audience of my media product

Evaluation - Question 2: Representation

All media representations are constructs, there are choices about mise en scene, make up, costume, props, expressions, setting and lightning. It also consists of camera shots, camera angles, position of the characters in the frame, soundtrack and editing.


The first character is the kidnapper,  played by Ben. Excluding the blood stains on his clothes, Ben's style of appearance is appealing to teenagers, the side fringe in particular being in fashion.

The victim, played by Courtney is wearing a short skirt and low cut top connoting her being a vulnerable target to be kidnapped but also displaying the fashion sense of most young teenage girls.

Evaluation - Question 1: Forms and Conventions of real Thriller openings (part 3)

Typical camera shots!


In 'Memento' we are not introduced to the main character by a close-up of his face, but by a close-up of his hand. This makes you think "who is that?" "what's going to happen?" It's a good way to automatically bring suspense.


After the titles to 'What Lies Beneath', we are introduced to the main character straight away by a close-up of her face. We are immediately drawn to her so we know we have to follow her story throughout the film.


In our thriller opening, we have taken both ideas from  'Memento' and 'What Lies Beneath' to introduce the main character. First we used 'Memento's' idea of a close-up of Ben's hand. 


We then had a close-up of Ben's eyes, using the idea of a close-up of the face from 'What Lies Beneath'. 

Evaluation - Question 1: Forms and Conventions of real Thriller openings (part 2)

Might introduce key characters!

This is the first actor mentioned in the opening. Guy Pearce plays the protagonist in 'Memento', naturally, it is his name at the top of the list of actors.


Carrie-Anne Moss plays the character of Natalie in the film. Her name comes after the protagonists name. Although she does play a big part in the storyline, she is not as important.


Joe Pantoliano is the third most important character. He is also quite a big character in the movie but, again, is not as important as the other two, therefore his name comes last in the list of key actors.


Of these three main actors, only Guy Pearce (the protagonist) is actually featured in the opening to this movie. The back of Joe Pantoliano's head is right at the end of the opening. The fact that the opening only features the protagonist outlines just how important he is.


However, in 'What Lies Beneath' none of the titles include actors names. We are introduced to the protagonist straight after the titles, so we then know that Michelle Pfeiffer will be starring in the movies. 


Our introduction to actors and characters started with "Starring Ben Bezzina". We started with Ben because his character was more dominant than mine, therefore his name came first.

Although my character was not dominant, she was still a key character.

Evaluation - Question 1: Forms and Conventions of real Thriller openings (part 1)

USING THE SAME FONT THROUGHOUT THE OPENING!


This is one of the titles from 'What Lies Beneath' - one of the thrillers we studied. The font used for this particular title was used throughout the opening.


Although the picture is not completely clear, you can make out that the font used for the above title, was also used for the title of the actual movie. 


This is a title from the film 'Memento'. Again, this font type is used throughout the opening.


Like in 'What Lies Beneath', this film not only uses the same font for all the titles, it also uses it for the actual title.


After looking at the above two films, we decided to follow tradition and use the same font throughout. We used it for the particular job and the name that went with it.
We agreed that it would be more affective to use the same font because it may have been confusing to have all different fonts announcing different titles.
Finally, we decided to keep the title as the same font because it will fit in with the feel of the movie.

Evaluation - Question 1: Form and Conventions of Thriller Title Sequences

Here are the main forms and conventions of Thriller Title Sequences 


We incorporated the specific order of a title sequence into our film, firstly being the two main characters starring...

Then the actual title itself....

Moving to the end with the editors...

And then finally ending with the Director.
I have taken a few shots from the film Seven as examples of some of the forms and conventions seen in title sequences
                                       As you can see for both character names, the title sequence keeps it font the same

This shot showing a razor blade and dirty finger nails displays the genre and subgenre of this film being a gritty, dark thriller

Monday 28 March 2011

Evaluation - Question 6: Audience Feedback

After collecting audience feedback from our class members, we created this image on Wordle.net using words that they had used when giving feedback about our thriller.


Friday 25 March 2011

Our Final Thriller Opening


Here is the final, finished version of our thriller opening title sequence.


Evaluation of Sounds


The sound track, was an overall success we used two programs to complete the final sound track, Logic Express and Sound Track Pro. Sound Track Pro was used to create the ambient diagetic noises, such as the country sounds, gun shots, car noises and heartbeats also the special sfx of the flash backs, the program is straight forward, so there was no difficulty with, creating the music, this program allows us to watch the footage whilst adding the sound, this worked to our advantage as we could make sure it was in sync with the visual side of the film.

Ben was in charge of creating the music which plays throughout the ambient noises, we discussed what type of music we felt best to have running throughout the title sequence, then Ben who is familiar with the music program Logic Express, put our ideas into an track, it was a success. He made a track using keyboards and strings, made sure the tempo was slow, creating a suspenseful atmosphere through the use of sound.

The sound track was and overall, success and pulls the whole opening together, making it more suspenseful and drawing the audience in, I have no regrets of the process of the sound track.

Creating the Soundtrack & Music

Once we had the rough cut finished and started editing the final sequence, we started working on the sound.
We used 2 programs to create the sound track. The first was Soundtrack Pro, which is part of the Final Cut Studio package. We used this for all of the sound effects and diagetic sounds (such as the ambient noise from the forest and the gun shot), and I used Logic Pro to create the music at home. Logic Pro is a professional quality audio and MIDI sequencing program used for recording and producing almost every type/genre of music.


Soundtrack Pro
In Soundtrack Pro, I went through the library of loops and sound effects to find sounds that would be suitable for the flashback scenes, as Courtney and Seb had already added the ambient sounds of the forest and gunshot at the end. I found several sharp, mechanical, and discordant sounds to indicate and enhance the effect of the flashbacks. These fitted the shots well, as they are supposed to be dark/painful memories which the main character is remembering.


In Logic, I used 7 software instrument tracks (controlled by MIDI) and one audio track, which was the SFX track created in Soundtrack. Unfortunately, I did not have the video file of the actual opening as it had not been exported from Final Cut yet, so I had to create the music with just the sound effects track as a reference to the timings of the flashbacks and character’s movements, but it worked out well in the end. 


I think the sound of the crow cawing works very well with the music, even though it was not intentionally added; it was just part of the ambient outdoor sound. Overall, I think the two parts of the soundtrack (effects and music) blend together seamlessly, and the end result sounds almost like a real film score.


Logic Pro


Evaluation of filming


The process of filming was rather difficult, as we had to create a schedule that everyone could work around, it was difficult finding a day where all members of the group were free, yet in the end we managed to get our filming done on two different, occasions although we had one member missing each time.

The first day of filming, was at Whipps Cross, Courtney, Ben and myself were able to attend, and we managed to shoot footage of the scenery, and the awakening of the main character and some of the flash backs, and the discovering of the body. Overall the first day of filming was an success, we managed to film a lot of footage, this was useful whilst editing because we weren't short of choices, my only regret is not planing the shots well enough, yet all footage was useable and we never had to reshoot.


The second day of filming was a challenge as the member who plays the victim, couldn't attend shooting due to family commitments, yet we made a success of filming without her, by filming extreme close ups, where the body isn't identifiable, this worked to our advantage, and ended up making the opening more discrete, which creates more suspense. We filmed the flash backs, I believe this day was a greater success, as the shots and lighting effects gave a good effect, and we had further knowledge from previous filmings the do's and don't, my only regret is not being able to find a day which was compatible for every member because of the short time left.

Thursday 24 March 2011

Sound track

The programs used to make our sound track: Sound track Pro & Logic 

Whilst making the rough cut, we also began to make our rough draft on Sound Track Pro. We thought it would be smart to begin the ambient diagetic sounds on Sound Track Pro as this software provides them, but to create the non diagetic music on Logic, a professional program designed for music. Our group was fortunate to have access to this software, which Ben owns, as he is familiar with this program, we assigned him to making the actual music. We discussed the type of music we wanted to play, we decided to make it suspenseful, using piano, strings played slowly.


Editing on Sound Track Pro: We used different sound effects such as 'country day' as it matches the mis en scene, during the flash backs we decided to add a distorted sound effect, relative to the sharp pains the character is feeling. The attack we contemplated weather to use the sounds of a heartbeat or weather it be too cliche, but we decided to include the sound of a women heavily, breathing and whilst the screen blacks out, the sounds of a gun shot.                 


Final Editing and Titles

Today was our last lesson before the deadline, and I spent almost the entire day (from 9am until 5pm) in the media room working on the final edit and titles. As we already had all the clips in order and most of the cuts done from our rough cut (which I edited last thursday), most of the editing today was spent added effects and transitions to the sequence, and also refining some of the match cuts and shot lengths.

The image to the right shows how much some of the flashback shots were edited on the timeline; this one in particular was chopped up into over 30 separate clips to create a ‘blinking’ effect. This was very time consuming and took longer than expected. Also added to the flash backs were the video filter effects. To start off with, we added the ‘Desaturate’ filter to all of the flashback clips, which took out the colour from them, leaving them in black and white. We did this to create a contrast between the real-time footage in the forest and the flashbacks.


Another effect we added to some of the flashbacks was called ‘Light Rays’, a type of glow which made the clip look hazy and slightly blurry. I was very happy with the outcome of using this filter as it made the flashbacks look like someone was trying to remember something, with the haze and blur adding to this effect. Also, some of the flashbacks were slowed down to around 70/80% of their original speed to create a dream-like (or nightmare-ish) feeling.


One of the flashback shots with the Light
 Ray glow and Desaturate effects added

Originally, we decided we were going to create the titles on Livetype, which is part of the Final Cut Studio package, but today we found that we would not have enough time to do this. Instead, we decided to create the titles on Final Cut to save time, although this meant that we were restricted with the flexibility and amount of effects/animation we could use on the titles.
We also added the CANDI Studios ident, which we found on the college media network. I imported it as a .mov file into Final Cut at the start of the sequence. 


Creating the titles in Final Cut
We used the font ‘MS Gothic’ for most of the titles, which is a sans-serif font that looks quite modern and almost electronic, but also serious and edgy at the same time. All the titles are in white, as this makes them show up easily on the screen (as most of our footage is quite dark). When placing the titles on the clips, I tried to put them in interesting places such as different corners each time, but had to be careful to decide where each one would be best seen and easily visible/readable. Finally, we added a quick fade in and fade out to each of the titles, so they did not appear to be jumpy and looked smooth.


The order of the titles was as follows:

  • CANDI Studios ident
  • Production company and distribution company
  • Stars 
  • Film Title
  • Casting director
  • Music
  • Editors 
  • Director 


Titles.

The titles was the finishing touch on the visual side of our opening. We had to follow the typical running order of a title sequence which is.

Running order of title sequence:

Company
Productions & associates
Stars
Title
casting 
more stars
director
Editing
Music

This is the order we followed as it was advised, because most movies run their title sequence in this order, with the exception of a few.

We had to include the Candi indent, which is used on all of the media projects, and then we then could add our actual titles. We created our titles on Final Cut Pro, we inserted text, positioning it over our footage instead of having a black screen, we decided to this to make it visually more exciting, and  to engage the audience. 


Throughout the title sequence, we used a white font we decided on this colour as it's the most noticeable colour against the background. The font which we used for the names is Ms Gothic and for the actual title we added the desaturate and glow effect which hinted toward its genre as it's slightly creepy and flicking resembles the flashbacks. 

Intextuality in 'Victim'

Our Thriller 'Victim' structure and story was inspired by the movie 'Momento'.
Momento has a unique structure where the story is told backwards, and through flash backs. To make our title sequence more interesting we decided to use flash backs, like Momento; we are able to separate the flashbacks from the current time because of the haziness and black and white filter, likewise to Momento.
The fact the structure is backwards, makes the thriller a 'psychological thriller' to make sure ours opening is of this genre, we followed this structure and made it clear without revealing too much about the narrative.

Evaluation of rough cut


 This is our first rough cut, at this stage we had not finished editing the sound, on sound track pro, and also hadn't edited in the titles as, we still need to cut some of the clips and we couldn't add the titles until, we had finalised our footage.

The rough cut duration is 2 minutes 45seconds, and our time limit is 2 minutes hence we have to cut the clips making, them precise and remove unnecessary footage, until the running time is closer to 2minutes. In order to meet our time limit we plan to cut the opening shot, and make the other scenes more sharp and quicker, also the gaps between the flash backs are going to be cut down.

At this stage we haven't included all of effects and transitions, we still plan to edit the contrast on the flash backs, making them look compatible to each other also to separate them from the current time, and to make it look like the characters memory, we are going to modify it adding an effect which adds a slight blur, showing the memories are distorted.

Creating the Soundtrack

After posting the rough cut, myself and Sebastian started creating the soundtrack whilst Ben and Rebecca started on re-editing our footage.


We experimented with different sounds to find the right ones to fit in with our footage. As Ben and Rebecca were re-editing our footage, we had to use our rough cut to create the soundtrack. We decided that we would create the soundtrack and then add in the edited footage after. This would mean that we would have to re-edit the soundtrack to fit with the new footage. 


These two photos are of our experimentation with possible sounds.


Once we had found the right sounds for our footage, we found where exactly on the opening it needed to go. We added the sounds of a gun being loaded and a gun shot to the ending of our footage. We also included a heartbeat to portray the victims fear.


We chose to have two main sounds for throughout the opening. The first being the sound of wildlife, birds, leaves, the breeze etc. We did this because we thought it would accurately give the affect of  the morning. the second sound was a that of a bass guitar. We used this for the flashbacks to give then more importance. We cut the sound of the wildlife whilst the beat of the bass was playing. Then we quietened the bass and played the quieter version throughout the rest of the soundtrack, only cutting it to play the louder one.  We still had the wildlife sound playing at the same time as the quieter bass.